Today was a cold, dreary, rainy day and I have a bag full of fall veggies. These elements combine into a hearty warm soup. Saying goodbye to summer is never easy, and if you just want to take it easy and pretend you are a hibernating animal, like me, this soup will serve you well for the next few days.
In case you don't want to eat soup everyday (but let's face it, soup is the world's most perfect food) and even if you DO want to eat this spiced belly-pleaser everyday, I suggest you store the lentils + broth in one container and the roasted veggies in another They will keep better, and allow for focused snacking.
It's vitally important to triple rinse those lentils in cold water, since you'll be using the well-seasoned boil liquid as your soup base. Don't skimp on the seasoning for this stage either, a well seasoned lentil soup transforms it into a dish you'll crave. It may even change your opinion on lentils overall.
What you'll use form your bag
All your sweet potatoes
Both your squash
1 onion
4 bulbs of garlic
a few small sage leaves
What else you'll need
For the lentils + broth:
2-2.5 cups lentils
1 Tbs oil of your choice
1 tsp salt
2 bay leaves
1 tsp cumin seeds, whole
1 black cardamom pod, cracked open
and then:
1/4 tsp tumeric
1/2 tsp cayenne pepper
4 small sage leaves, chopped
For the roasted veggies:
1 tsp cinn
2 tsp cumin
1 tsp salt
2 tbs oil
1/2 tsp ginger
1/2 tsp smoked paprika
First, start cooking your lentils
Lentils, definitely need to be well rinsed. 2.5 cups of lentils in 8 cups water, and add your seasonings straight away. Cover, bring to a boil, stir, and reduce heat to a simmer covered for 25-30 min (This is the ideal time to preheat your oven to 400 degrees and prep your veggies.)
When the lentils are soft, but still have some body to them, turn off the heat and let it sit in the warm pot and liquid. Add the turmeric, and 1/4-1/2 tsp cayenne pepper to taste, the chopped sage and stir. Keep covered until ready to serve, or allow to cool completely before putting in the fridge.
Next, roast your veggies
Chop all your veggies so no dimension is larger than 3/4 of an inch. As before, the garlic can stay whole with just the bottom of the entire bulb chopped off. I do not peel my sweet potatoes because the peel is chock full of nutrients, but I do peel the squash because its too hard to eat comfortably.
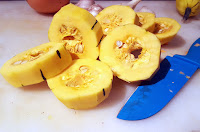
When chopping the squash, carefully remove the seeds, and reserve them. Slice them into 1/2-3/4 inch discs, and then halve the discs,
to scoop the seeds out. This will also make it easier to chop into uniform pieces.
Throw the chopped veggies into a roasting pan, and toss them in the oil and seasonings above.
Place them in the middle rack of the oven for 10 minutes, then stir, and another 15 minutes.
Now, prepare your seeds
Seeds are the hidden gem of all squash, you can eat them on their own, or sprinkle them onto
something you want a flavorful crunch added to, but they also pack in the nutrition. You do't want to eat too many, but it is always good to consider parts of the plant you may normally overlook.
Rinse the seeds in cold water and separate them as best you can from the guts. Sprinkle some sea salt over them and place them on the top rack of your oven.
Place them into the oven for the last 15 minutes of your veggie roast.
When it is time to serve, spoon in some lentils and broth to the bottom of a bowl, and top with the veggies and seeds. also recommend adding some apple slices, fresh basil and more fresh sage, and a pinch of cardamom powder if it is handy.
Enjoy!
Wednesday, September 28, 2016
Thursday, September 22, 2016
Roasted Pesto Mashed Potato Stuffed Peppers
Stuffed peppers are just about the most perfect food. Full of flavor, a little bit sweet, and a really savory kick when you roast it. You can put almost anything in them, but I'll bet you never thought to stuff potato into them, so here we go!
The potato mix makes more than enough to stuff all of your peppers, large and small, and you can even boil a larger number of potatoes than you need and reserve some for plain mashed potatoes for tomorrow night's starch side dish.
The best part is the flavor absorption, which allows you to highlight the basil, making this a pesto-hybrid, combined with the roasted peppers, garlic, and onion and no doubt you'll lick the spoon, the plate, and the food processor clean (please restrain from licking the blade :) )
Serves 2 for dinner, or 6-8 as party finger food in the small peppers.
What you'll use from your bag:
3 large red peppers for stuffing
4 orange peppers for roasting
1 medium or 2 small onions
2 garlic cloves
all your basil
5 medium or 8-10 small potatoes
What else you'll need:
1/2 cup olive oil
1/4 cup nutritional yeast
1 tsp salt
1/2 cup cashew milk
1/4 tsp sage powder
1 tsp tarragon leaves
First, you'll preheat the oven to 400 degrees
While the oven is preheating, add some salt to a large pot of water, and boil your potatoes. This takes approx. 25-30 minutes until they are soft. (I keep my skins on, but feel free to peel)
Then, prepare your veggies to roast
Find the flat side of your large peppers, and slice a thing layer of the OPPOSITE side, exposing the hollow so you can remove the seeds. Chop the thin layer.
Take your 4 small peppers, chop the ends, remove the seeds, and rough chop.
Rough chop the onion, and cut the ends off of the garlic, keeping them in the paper.
Toss them in a light amount of oil, and place them on a cookie sheet, for 10 minutes, then flip, and another 10 minutes.
Now, add the remaining ingredients into the food processor
When the roasted veggies are done, set the large peppers (or stuffing peppers) aside, and toss the remainder into the food processor with the basil, spices, oil, and cashew milk, making sure to squeeze the garlic out of the paper case.
Take the tender potatoes out of the boiling water, drain, and quarter them, and toss it into the food processor, and pulse to combine until desired consistency.
Scoop the filling into the empty roasted peppers, and dress with any stray basil leaves or pepper pieces.
Enjoy!
Thursday, September 15, 2016
Deviled Potatoes
Anyone else's refrigerator feel too empty on our CSA week off? It's good to have it full of Karma Farm produce again.
Summer is really almost gone, just a few days left to soak in the backyard parties, lazy weekend sun, and exposed skin walks. As we turn our attention to fall, the hearty foods like potato and pumpkin are all over, and before we dive headfirst into pumpkin everything, I thought I'd help you transition smoothly with a light finger-food to get your hearty started with potato.
These deviled potatoes make excellent party hors d'oeuvres, or with a few extra garnishes or a green side can easily make a filling meal. Whether snacking or carb-loading, you can enjoy these low-fat deviled egg replacements with only about 30 minutes of cooking.
Makes about 12-15 medium sized deviled potatoes, with a but more devil spread, you can enjoy on toast or chips :)
What you'll use from your bag:
All your potatoes
1 hot pepper of your choice
What else you'll need:
1 can of Cannellini beans, chickpeas or other white beans, drained
1/4 tsp coriander seed, ground
1/2 tsp smoked paprika
1/2 tsp garlic powder
1/4 tsp onion powder
1/2 tsp sea salt
1/4 tsp Kala Namak (India Black Salt)
1/4 tsp turmeric powder
2 tsp nutritional yeast
1/4 cup vegetable broth
splash of lemon broth
pinch of black pepper
Oil for taste, roast (optional)
First, preheat the oven to 400 degrees
Scrub and rinse the potatoes. Cut them in half so you have two fat halves, rather than two long flat halves. Toss them in 1 tsp oil (optional) and place them with their whites down on a foil covered baking sheet.
Place another piece of foil on top of the potato halves, fold the
bottom layer up around all of the edges to create an envelope, that will speed up the baking process incredibly on these potatoes.
Roast for about 20 minutes, until you can easily scoop the insides out, and leave a strong and in-tact outer shell. (they will be cooked more later, don't over cook them now!)
Now, make your Devil Spread
Add the beans, the broth, and all the spices into the blender, and turn on high for 2 minutes, while the potatoes roast. If the fatty satisfaction of eggs is something you think you'll miss too much, or you want a much thicker mixture, add 1 tablespoon of oil during this step. Remember, as soon as those potatoes are done, all their insides are going into this mix too. Taste your mix, it should be rich, slightly egg-y, and flavorful. If you need more egg flavor, increase your India Black Salt, if you need more pow for a wow, add more smoked paprika, or a couple seeds from your hot pepper, and blend for another minute until completely smooth. Don't forget to scrape down your sides, so all your spices are mixed evenly.
Take your hot pepper and slice it as thinly as possible, removing all the seeds. Add these to either 2 tablespoons of broth or 2 tablespoons of oil, a pinch of salt and pepper, to let "infuse" while everything else comes together. You can always throw one or two pieces into the bean spread to spice it up too.
Then, scoop our your potatoes and finish cooking them
With an oven mitt on (trust me) hold a potato half in your left hand, and use a small spoon to scoop the insides out in a round shape from the middle. You will be left with cute hollows that will get baked before you fill them up withy you devil spread.
Spray or coat the potatoes with oil or broth, and return to the oven, white sides exposed, no foil. Bake for 10 minutes.
While the potatoes finish up, blend the potato insides into the bean mix. This will thicken the mix up considerably, but will also mute the flavors, so make sure you are spicing this for your tastebuds. I don't want you to set yourself on fire now that the heat outside is turning down :) Remember, we have hot peppers for garnish too.
When the potatoes are done, spoon them to fill, sprinkle with cayenne, smoked paprika, and garnish with hot peppers and drizzle the rest of the oil on. You can also top with tomato, Cheeze Sauce or anything else your heart might desire.
Saturday, August 20, 2016
Tofu Scramble
Breakfast isn't really a time when most people think of vegetables, but it could be. Take the classic scramble, here with a plant-based twist. A nice firm tofu, the right seasonings, and farm-fresh veggies combine to create a mouth and eye-pleasing alternative to the classic, that is quick to make, filling, and without all that pesky saturated fat and cholesterol. Best of all, you can spice it up however you like, perhaps middle-eastern for the Shakshuka fans of the world, or Italian spices like basil and oregano for the diner style breakfast club.
What you'll use from your bag:
This is the most important step when working with tofu, and if often the reason people think they don't like it. Tofu gets packaged in liquid to keep it fresh, but the liquid has no flavor, and will often keep flavors from penetrating the tofu and DEFINITELY keep the texture soft, rather than hearty and meaty, so proper pressing to remove the liquid is going to change your tofu game. I recently discovered the most amazing way to press tofu (and lots of other things) is using a salt slab cutting board. Or in this case, 2 of them. This is the perfect amount of weight, and salt cures it which not only speeds up the liquid draining time, but gives is a nice mineral rich, salt flavor, so you can actually skip the added salt. If you don't have one, they are MAJORLY affordable right now at Trader Joe's, or you can wrap your tofu in a dishcloth, and put a cutting board on top of it with a few cans of something heavy, like beans. This takes about 5-10 minutes, and you can prep your veggies while this happens
When its done, it will look like cooked scramble, which is pretty cool, since that is what we are making :)
This is a great technique that you can also apply to feta and ricotta toppings, and is overall a great stab at preparing tofu in new and delicious ways.
Serves 4, or 2 really hungry people, and reheats well. Great on its own or on toast or in breakfast burrito wraps.
What you'll use from your bag:
1 Tomato (I had some left over from last week's bounty), diced
1/2 hot pepper, or a whole one if you like the heat, diced seeds removed
3 small sweet peppers, diced
1 red onion, diced
3 cloves garlic, finely chopped
What else you'll need:
2 Tbs avocado or safflower oil
1/4 cup fresh basil, chopped and added at the end
1 block firm tofu
1 tsp cumin or curry powder (skip for a more Italian or French style)
1/4 tsp India Black salt, for the egg flavor
1/2 tsp parsley, dried
1/2 tsp black pepper
1/2 tsp sea salt
2 tsp nutritional yeast
1/4 tsp fennel seed powder
1/2 tsp turmeric, for health and color
First, drain and press the tofu
Next, start your sauté
Heat oil in a frying pan, and add your diced onions, garlic, and hot pepper.
While they soften, assemble your spices in a large mixing bowl, and toss in your tofu in large chunks. A potato masher works best, but a fork will work just fine, as you are trying to mix the spices into your tofu as you "scramble" the tofu, into nice pillowy, bite sized, flavorful clumps.
It will be yellow, from the turmeric, and smell of egg, from the India Black salt, and be delicious from all the spices, but will be EXTRA great warm and with all your veggies.
Now, add your tofu to the sauté mix
Let the oil, onion, garlic and hot pepper fully integrate with the tofu mixture, and you will notice the scramble get a brighter yellow, and even slightly brown in some area. This is excellent because it means all those flavors are penetrating, and intensifying.
Add your diced tomato, and sweet peppers in, and sauté for 2-3 minutes until they soften. This adds some moisture back into the mix, so decide how "well-done" you like your textures, and if you want dryer scrambles, bump that up to 5 minutes.
Toss in your basil, stir until its soft, and take a good long sniff at the heaven in your pan.
If you are going for French style, add some vegannaise, or some coconut creme fraiche with some Herbs d' Provence, for Italian, add some thyme and oregano and serve over toasted Ciabatta, and for my curry style, add that full pepper, and garnish with a little sprinkle of ginger and light a fire under your day!
Enjoy!
Tuesday, August 16, 2016
Farmstyle Potato and Leek Soup
With the summer season abundance comes very full CSA bags, and if you are running short on fridge space, or have trouble using all of your produce every week this soup is ideal for you. One recipe uses most of this week's bag, but lasts the rest of the week and can even feed your entire family.
Best of all, if you time it right, it shouldn't take you more than 45 min to make, and can be eaten immediately, or chilled, served hot or cold.
Eating your colors was never easier!
Serves A LOT, plan for 8-10 big bowls.
What you'll use from your bag:
All of your potatoes, diced
2 red onions, diced
2 summer squash, sliced & quartered
1 medium leek, 2 small leeks, half moon sliced
1 small cabbage, coarsely chopped
5 small red/orange peppers, half moon sliced
What else you'll need:
3 cloves garlic, chopped or minced
1/4 cup oil (safflower or avocado recommended)
8 cups vegetable broth
For the "buttermilk":
juice of 1 lemon
2 cups of coconut cream
For the end, spice mix:
1/4 cup cinnamon basil or other basil, chopped
1 tsp mustard powder
1 tsp coriander seed powder
1/2 tsp black pepper
1 1/2 tsp sea salt, fine
1/2 tsp dried tarragon
1/4 tsp thyme
1 Tbs fresh dill, and more to garnish/serve
1 tsp garlic powder
1/4-1/2 tsp cayenne pepper (dont be afraid, the cream levels this smooth)
First, heat your oil on low/med in a large soup pot
While the oil heats, dice your onion, and toss them in as you go, then dice the garlic and toss it in, and then the potatoes. Think homefries, a quick dirty smallish dice, to encourage softening and even cooking. A pinch of salt here is also a good idea.
While they cook, chop your peppers, squash, and cabbage. When the potatoes are tender, add the peppers and squash and cook for 3 minutes. Then your cabbage, and cover. 3 minutes.
Now, add your broth
I can't stress the importance of a good full-flavored broth for making your own soups, and I encourage you to make your own broth with scraps from your CSA produce! After to add the broth, stir and scrape the bottom of the pot to get all the ingredients circulating. Cover, reduce heat, and simmer 8-10 minutes.
While the soup simmers, add 2 cups coconut cream (the kind from a can!) into a bowl or measuring cup and squeeze the lemon juice in, stir or whisk thoroughly, and allow to sit at room temperature to curdle.
Once the simmer is close to a boil, add the milk
Mix the soup really well, until you can't see any white cream concentrated anywhere. Turn the heat
back up and simmer 5 minutes, uncovered.
Add the spice mix, reduce the heat to the lowest setting, and stir constantly for 1-2 minutes. Remove from heat, and let stand 5-10 minutes before serving (hot) or chill overnight to serve cold.
Serve it with fresh ground black pepper, a cashew dill sauce, fresh dill, or smoked salt.
Enjoy!
Thursday, August 11, 2016
Quick Homestyle Tomato Sauce
Homemade tomato sauce, is there anything more delicious, more classic, and more symbolic of truly from-scratch home cooking? There's a good reason: traditional recipes call for over 4 hours of long simmering....ain't nobody got time for that.
This recipe packs in all the flavor density of peak season, farm fresh tomatoes, with time saving tricks to peel the tomatoes with a parboil, followed by a chop and stew, which reduces the simmer time to just over 1 hour. Use that time to roast your veggies for a lasagna, and cook your noodles, or in my case to roast and scoop up a spaghetti squash, to toss into the sauce as soon as its ready, and while they are both hot!
This recipe prepares about 4 cups, the size of a large jar from the market.
What you'll use from your bag:
7 medium tomatoes
1 Red onion, finely diced
1/2 jalapeño, diced, or the entire thing if you like it hot
What else you'll need:
4 cloves of garlic, diced
1 Tbs Tomato paste (they make this in a tube now, so you don't have to waste the entire can)
1 tsp sea salt, fine
1/2 tsp black pepper, the fresher ground the better
5 cups veggie broth
2 Tbs olive or avocado oil
1/2 lemon (for the juice)
1 Tbs red wine vinegar, or soured red wine (you know, the kind you've left open too long)
at the end:
3/4 cup fresh basil (packed, because you can never have too much basil in tomato sauce)
1/3 cup fresh oregano (oregano form the farm is incredibly aromatic, highly recommended)
1/3 cup fresh cilantro
First, fill a large soup pot with about 6 cups of water
Take all of your tomatoes, and carve Xs into the butt of them, where they come to a little point. This will serve to allow the water to loosen the skin from the flesh of the tomato, and make an easy starting point to peel. The skin tends to slide off when little coaxing after a light boil.
Add the X'd tomatoes into the water, and bring to a boil, and allow to boil for about 2 minutes. This is softening the tomatoes and loosening the skin at the same time and will reduce the overall cook time in the later step.
When removed from the water, the skin tends to look like this, and easily peels and slides off, reducing a lot of prep time. You can keep these skins for broth, salads, or compost.
Next, heat your saucepan and prepare your vegetables
It's important not to use stainless steel with high-acidic dishes like tomato sauce, so for this I am using ceramic covered cast iron (Le Creuset). It also makes for MUCH easier clean up. Heat the oil in the pan, and add your finely diced onions and garlic, sauté, and after 2 minutes add the jalapeño.
Take your peeled tomatoes and chop them into at least 6 pieces, and toss them in with the sauté, allowing them to scorch, and stir them once or twice. While they scorch, whisk the tomato paste and vinegar into the vegetable broth, and once the tomatoes are scorched on all sides, pour the broth mixture into the
rest.
Bring to a low boil, and immediately drop down to a simmer, and let simmer for 1.5 hours, stirring occasionally.
Then, you'll add the herbs
Towards the end, say in the last 15 minutes, start to chop your basil, oregano and cilantro. Toss them
into the sauce and stir evenly and allow to cook with the remaining time. The sauce should look more like sauce and less like chopped tomatoes as they have broken down, the liquid should also be substantially reduced.
Allow to cool, and keep in the fridge for up to 2 weeks, or enjoy immediately!
Saturday, July 30, 2016
Cherry Tomato Gazpacho- Raw, Fast, Easy and Delicious
If you are like me, than summers aren't exactly easy. You need to cram family visits, outdoor activity, work, and recovering from the heat into practically everyday. So you need something, fast, something cooling, something that'll keep in your fridge and something that you can make with allllll those cherry tomatoes we keep getting in our Karma Farm bags :)
This gazpacho can be ready in under 10 minutes, with a food processor, and only requires the most minimal of pre-chopping. If you are chopping by hand, I recommend a VERY sharp, very large chef knife to speed through the fine dicing...and you will get a chunkier soup, which is totally fine.
This recipe will produce 2 hearty portions, or 4 lunch time portions, depending on when you need the most humidity recovery intervention.
What you'll use from your bag
2 orange peppers
2 spring onions
~ half your cherry tomatoes
red onion (technically from last week, but you may use store-bought)
1-2 cucumbers (this week's or last's)
What else you'll need
2 spring of fresh parsley
1/4 cup cilantro
1 Tbs fresh dill
1/2 lemon
2 radishes
1 Tbs balsamic vinegar
2 tsp agave nectar
salt and pepper to taste
Optional: 1 tsp crushed red pepper
First, pre-chop the onion, cucumber and peppers
You can leave the tomatoes, whole, but it's best if no other ingredient has pieces larger than your tomatoes, to ensure a more consistent final texture.
Add all your ingredients to the food processor, for me that just about filled my 14 cup. Feel free to divide your ingredients in half, or add the tomatoes last, as it will compress very fast as it becomes
chopped.
I usually pulse in counts of 5 until the texture is still a little chunky, but looks completely mixed, with no large chunks of any one vegetable or herb. This usually takes about 1 minute, and I scrape down the processor bowl with a spatula once or twice and add salt and pepper to taste.
Once it is a nice texture, you may chill it and enjoy it for up to 5 days, or eat it straight out of the processor bowl (which is usually what I end up doing!)
In the picture, my bowl is adorned with raw sprouted watermelon seeds, and if you haven't tried them, I encourage you too! The black shell casing is removed, and the sprouted seeds have a wonderful nutty flavor. You can find pre-sprouted seeds for sale at places like Mom's.
ENJOY!
Classic Half-Sour Pickles
Not sure what to do with a pile of cucumbers of all sizes? Well, especially since Harmony Cucumbers are pickling cukes, I say: We Can Pickle That (part 2) The thing to keep in mind about pickling varieties, is that they don't keep very long in the fridge, and since they aren't very tasty on their own (but they're fine to cook with) I'm taking all of mine straight from the bag and into my pickling jar.
This method is a lacto-fermentation method, meaning that it uses the natural bacteria in water and air to pickle the vegetable with the preservative assistance of salt, and uses no vinegar. A vinegar pickle is a "full-sour" and these get referred to as a half-sour. Better yet, the fermentation allows for a concentration of pro-biotics, most importantly the lactobacillus bacteria that lends itself to the name lacto-ferment.
I'm using a 2L jar, but you could probably use a 1/3 gallon, or 6 or 7 cup jar with an air-tight lid. Using this method your pickles will be ready in 5-7 days!
What you'll use from your bag:
All your cucumbers, make sure to wash them thoroughly!
What else you'll need:
1/2 tsp coriander seeds
1 tsp black pepper corns
1/2 tsp yellow mustard seed
1 black cardamom pod
1/4 tsp fennel seed
1/4 cup sea salt
small handful of fresh dill
1 bulb of garlic, crushed
6 cups water, filtered
You can leave the spices whole, but its much better to invite the liquid to mingle more, so the pickles become more infused.
Add the spices to the bottom of the jar, and then add the crushed garlic, and the fresh dill.
Next, add the salt to create a brine
Add the salt right to the top of the pile at the bottom of your jar, and then cover with the 6 cups of water. Cover with the lid, and shake until the salt has dissolved completely, the dill should rise to the surface of the liquid.
Note: if you use a smaller jar, drop the liquid to 5 cups.
I usually leave them whole, and I haven't tried making sandwich slices, or spears, so I just dump them all in, allowing any excess water to spill into the sink (you want an inch of air or less in between the liquid and your jar lid) and then I place the jar, sealed, into my fridge.
Check them in 5 days to see if they are pickled enough for you, and if not check them once or twice. Theoretically, half-sours should keep for about a month, but the above picture are pickles I made at least 5 months ago and are still perfect and tasty (but VERY pickled). Unlike vinegar pickles, they won't sour up, or have a strong pickle smell, but they should be firm and still a little crisp, like an in-between vinegar pickles and cucumbers in appearance.
Enjoy!
Subscribe to:
Posts (Atom)